Open topic with navigation
Add Logic and Shifts to the Model
By defining your shape's properties, you have already added basic logic
to your model. Now, we will use the Logic Builder to add advanced logic
to some of our activities for resource usage and incrementing and decrementing
the WIP variable.
Additionally, we will assign shifts to our resources and some of our
activities in this topic.
Adding Advanced Logic to Activities for Resource Usage
For simple resource usage, we have assigned resources for work on entities
at certain activities using the Resource field in the Activity dialogs.
For example, this was the case for Op 30 Install PCB.
However, Op 20 and Op 40 requires more advanced resource logic. In this
case, we leave the Resource field blank, and then use the Logic Builder
to add more advanced resource usage logic.
To begin, Line Op 1 does not need to be used at the Op 20 activity for
its entire processing time; therefore, we do not want to simply put Line
Op 1 in the Op 20 activity Resource field. Instead we will use the Logic
Builder to specify that the resource is to be used for only 10 minutes
to load the oven.
- Right
click on Op 20 Vacuum Bake, and select Properties to open the Activity
dialog.
- Click
on the Logic button to open the Logic Builder.
- Double
click on the USE statement on the left side of the Logic Builder. This
statement allows you to assign resources to work on entities at activities.
- A
dialog will appear showing the available options for the statement. For
information on this dialog, press F1 while using the dialog.
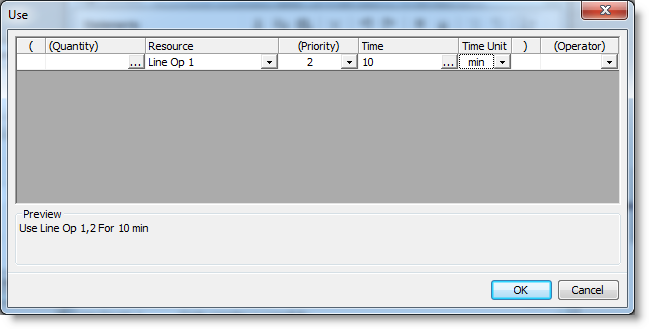
- Fill
in the fields of the dialog as shown in the image above.
- Click
OK to place the statement (Use Line Op1, 2 For 10 min) in the logic builder.
- Close
the Logic Builder to
save the logic.
Next we will enter a different method for capturing, using, and then
freeing multiple resources at activity Op 40 inspect and Test.
- Right click on Op 40 inspect and Test, and select
Properties to open the Activity dialog.
- Click on the Logic button to open the Logic Builder.
If you made an error, you can edit the statement by double clicking on
it.
- Double click on the GET statement on the left side of the Logic Builder.
This statement allows you to capture resources to work on entities at
activities.
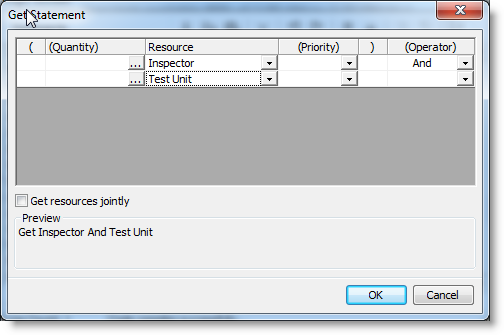
- Fill in the fields as shown above (be sure to check
"Get resources jointly") and click OK.
- Next, double click on the WAIT statement, enter a
Value of 25 with time units of minutes,and click OK. This will cause the
resource to work on the entity for 25 minutes.
- Finally, double click on the FREE statement, choose
ALL for the Resource value, and click OK. This will free the resources
after the 25 minutes, so they will be available for work on other entities.
- Double check that the Logic Builder contains the following lines for
Op 40:

- Close the Logic Builder to save the logic.
Adding Advanced Logic to Activities for WIP Variable
We will now add the logic to increment and decrement the variable Assy_WIP
as the Assy entities arrive and leave the process.
- Right click on the Op10 Clean and Prep activity,
and choose properties from the right-click menu.
- From the properties dialog, click the Logic button,
which will display the Logic Builder.
- In the list of statements, double click on the Inc
option.
- From the Inc dialog, select the
Assy_WIP variable, and then click OK.
This will cause the Assy_WIP variable to increment by one each time
an entity enters the process. We will now enter a Dec, so that the variable
counter will decrease by one each time an entity exits the process.
- Right click on the exit connection leaving Op 50
Record Unit Statistics, and choose properties from the right-click menu.
- From the Routing dialog, click the Logic button,
which will display the Logic Builder.
- In the list of statements, double click on the Dec
option.
- From the Dec dialog, select the
Assy_WIP variable, and then click OK.
Adding Shift assignments to Resources and Activities
All resources, except the Inspector and the Test Unit are available
8 hours per day, from 7:00 AM to 3:30 PM, with a ½ hour unpaid break from
11:30 to 12:00. These resources are not allowed to work overtime, so they
leave immediately when their shift is over.
Adding shift assignments is done by:
- Open the properties dialog for the resource or activity.
- Click on the Calendar button.
- Click Browse to enter the path to the shift file.
- Select the appropriate .pmcal file, which is in the
same directory on your computer as the Tutorial.vsd file.
- Repeat for all resources.
Assign shifts to resources and activities according to the following
specification: Shift Assignments