A conveyor is any moving track, belt, chain, or roller which transports parts from one location to another. This section will help you better understand conveyors and how to model them using ProModel.
ProModel determines the capacity of a conveyor by its speed and load spacing rather than a stated capacity. Specifically, capacity is a function of the minimum allowable interload spacing on a conveyor (which is the length of a queue position in the case of accumulation conveyors) and its length. It may be desirable, however, to impose a limit to the number of loads permitted on the conveyor at any one time.
Conveyors usually do not pick up and drop off loads as in the case of lift trucks, AGVS, and cranes. You must place loads onto and remove them from conveyors.
Depending on the nature of the conveyor and its operation, modeling a conveyor can be straightforward or complex. For single conveyor sections, modeling is very simple. Conveyor networks, on the other hand, give rise to several complexities (recirculating, merging, etc.) that become more difficult to model.
Simulating your conveyor system will help you address design and operational issues, answering the following questions:
You may represent conveyors as one continuous span of randomly spaced parts (e.g., belt conveyor) or as intermittent spaces or carriers located at fixed intervals (i.e., trolley conveyor).
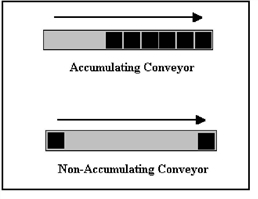
In addition to continuous or intermittent conveyors, some conveyors permit loads to accumulate or queue if conditions impede forward motion progress. ProModel refers to these conveyors as accumulating conveyors. Other conveyors provide no queuing and halt all activity if forward progress of the leading part or load stops. ProModel refers to these types of conveyors as non-accumulating conveyors.
The following figure illustrates how entities can continue to accumulate after the leading load stops on an accumulating conveyor. How a non-accumulating conveyor can accept one additional entity if the leading entity stops, however it is unable to advance any further since the entire conveyor stopped.
The different combination of continuous or intermittent conveyors and transport or accumulation conveyors result in the following four different kinds of conveyors that ProModel is capable of modeling.
|
Type |
Example |
|
Continuous, Non-Accumulating |
Belt, chain |
|
Tray, trolley |
|
|
Continuous, Accumulating |
Roller |
|
Intermittent, Accumulating |
Power-and-free, towline |
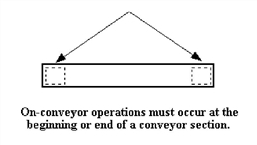
For best results, you should model carriers or part holding devices on intermittent, accumulating conveyors as though the devices were entities waiting for you to load and unload other entities to and from them (see "Load" is ProModel User Guide) as you move parts. An alternative but similar method is to use a JOIN statement and then specify two routings when you want the part removed (see Example E in "Modeling Conveyor Systems" in the next section). Yet another way of modeling parts with carriers on a conveyor, is to simply set a part attribute equal to a particular value if the part is on a carrier. If the part is not on a carrier, assign a different value to the same attribute. Operations may occur at either the beginning or end of a conveyor as shown here.
Conveyors used for simple queuing or buffering often consist of a single stretch or section of conveyor. Loads enter at one end and exit at the other end. Load spacing is generally random. These types of conveyors are generally quite easy to model. The modeler merely defines the length and speed and states whether the conveyor is an accumulating or non-accumulating conveyor.
A conveyor network consists of two or more sections that are connected together to enable part merging, diverting, and recirculating. In such instances, a conveyor may have one or more entry points and one or more exit points. Furthermore, part entry and exit may not always happen at the beginning or end of the conveyor. In ProModel, loads or entities must always enter at the beginning and exit at the end of conveyor networks. To model merging or branching in the middle of the conveyor, break the conveyor into smaller sections.
A conveyor system is a combination of one or more types of conveyors which interact to move parts. Such a system may include branching, merging, and looping. The process of dividing conveyors into logical sections is fairly straightforward if you understand what constitutes a conveyor section.
For modeling purposes, a conveyor section is defined as any independently driven segment of conveyor of the same type. Conveyor turns are irrelevant as long as the conveyor remains unchanged and both are actuated or stopped together.
In ProModel, an accumulating conveyor section must end at the point where parts are permitted to accumulate or back up. This generally occurs at a transfer point or process location.
While not essential, it is visually more effective to draw conveyors to scale on the layout. You should also size entities traveling on a conveyor to scale when you create them. Setting the length of a conveyor different from the scale length or conveying entities that have a length or width that is not to scale will result in the appearance of load overlapping or excessive load spacing. The underlying logic and simulation is still valid, regardless of whether the graphics are to scale.
Loads may appear to jump when transferring from the end of one conveyor to another conveyor. This is a result of ProModel not allowing a load to transfer onto a conveyor until there is room for the load. Including a transfer time in the Move Logic column of the Routing edit table can result in smooth movement between conveyor sections. Defining a variable called Transfer_Time and using that variable rather than entering the actual time allows for experimentation with various conveyor speeds with minimal modeling changes.
Clock precision is also important. Note that movement of one foot at 40 feet per minute will take .025 minutes. If clock precision is set at .1 minutes, truncation will result in zero time. Make sure you check your model for the correct clock precision. For most conveyors, a clock precision of .001 is adequate. ProModel may require greater precision for high-speed conveyors where speeds are greater than 200 fpm.
Modeling conveyors in ProModel is quite easy. Select the conveyor icon in the Locations Graphics window and place the beginning and ending points of the conveyor using the mouse. Clicking the right mouse button will end the conveyor. Left-click to add or delete a joint and allow the conveyor to bend.
Some users prefer to display the grid and select the Snap to Grid option in the View menu. Others will leave Snap to Grid off. You may find that the precise positioning of a conveyor is easier when you turn Snap to Grid off and set the Zoom sufficiently high. When you need to change the type of conveyor to accumulating, double-click on the conveyor icon in the layout, select the Conveyor Options button, and select Accumulating from the Conveyor Options dialog.
The following six examples show various ways of modeling conveyors:
Example ARoutes one or more parts from one or more non-conveyor locations to any conveyor location.
Example BRoutes one or more parts from any conveyor location to one or more non-conveyor locations.
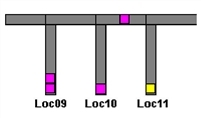
Example CRoutes single parts from any conveyor location to one or more other conveyor locations.
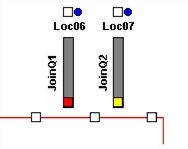
Example DJoins one or more parts from one or more non-conveyor locations to another transporting entity (e.g., a pallet or carrier) at any conveyor location.
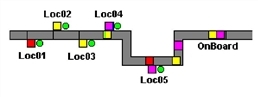
Example EAccumulates multiple parts coming from one or more non-conveyor locations onto a conveyor location.
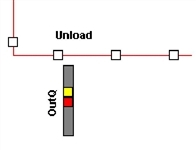
Example FSplits parts at a conveyor location sending one or more parts to a non-conveyor location and a single part (e.g., a pallet or carrier) onto the conveyor.

|
© 2012 ProModel Corporation • 556 East Technology Avenue • Orem, UT 84097 • Support: 888-776-6633 • www.promodel.com |